OCL provides special syntax for specifying pre- and postconditions on operations in a UML model. Pre- and postconditions are constraints that define a contract that an implementation of the operation has to fulfill. A precondition must hold when an operation is called, a postcondition must be true when the operation returns. The USE tool allows to validate pre- and postconditions by simulating operation calls. The following describes how this feature works.
Contents:
- 1. Example Model
- 2. Adding Pre- and Postconditions
- 3. Validating the Model
- 3.1 Initial State
- 3.2 Calling Operations and Checking Preconditions
- 3.3 Operation Effects
- 3.4 Exiting Operations and Checking Postconditions
- 3.5 Result Values and References to the Previous State
- 3.6 Visualization as Sequence Diagram
- 4. An Example with oclIsNew
- 5. Nested Operation Calls
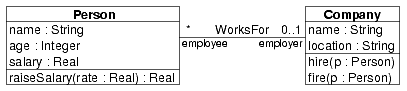
Consider the following UML class diagram for a simple model with persons that can work for a company.
Here is the USE specification of the model shown in the class diagram that we use in the sequel.
We add pre- and postconditions for the hire and fire operations in class Company. The USE specification is extended as follows.
The first precondition of the hire operation is named hirePre1 and makes sure that the operation can only be called with a well-defined person object (Note that the operation isDefined is a USE extension. It is not possible to express this constraint with standard OCL). The second precondition (hirePre2) makes sure that the person passed as parameter p is not already an employee of the company. The postcondition (hirePost) guarantees that after the operation has exited, the person actually has been added to the set of employees. The constraints for the operation fire work just the other way round.
Now let's test the pre- and postconditions. First we start the USE tool with the specification of the example model.
At the prompt, we enter the following commands to create two objects.
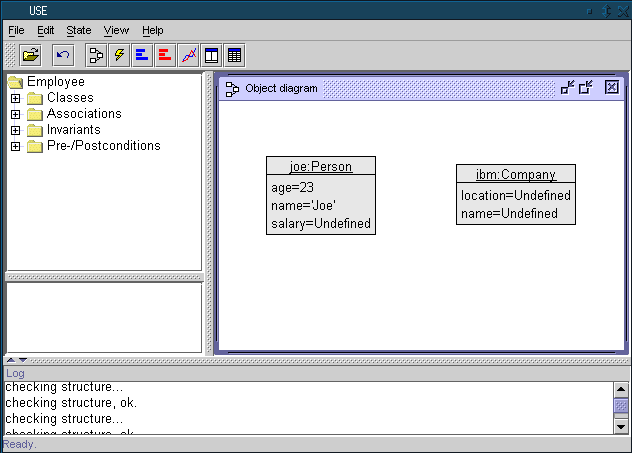
The current system state can be visualized with an object diagram view in USE (click on the picture to get an enlarged version).
Next, we want to call the operation hire on the company object to hire joe as a new employee.
Operation calls are initiated with the command openter. The syntax is
!openter <source-expression> <operation-name> ( [<argument-expression-list>] )
where <source-expression> must be an OCL expression denoting the receiver object of the operation named <operation-name>. Depending on the operation's signature an <argument-expression-list> has to be passed to the operation.
The following command shows the top-level bindings of variables. These variables can be used in expressions to refer to existing objects.
We invoke the operation hire on the receiver object ibm and pass the object joe as parameter.
The openter command has the following effect.
In the example, the call of the operation hire was successful because both preconditions are satisfied. The stack of currently active operations can be viewed by issuing the following command.
We can verify the bindings of the self variable and the formal parameter p as follows.
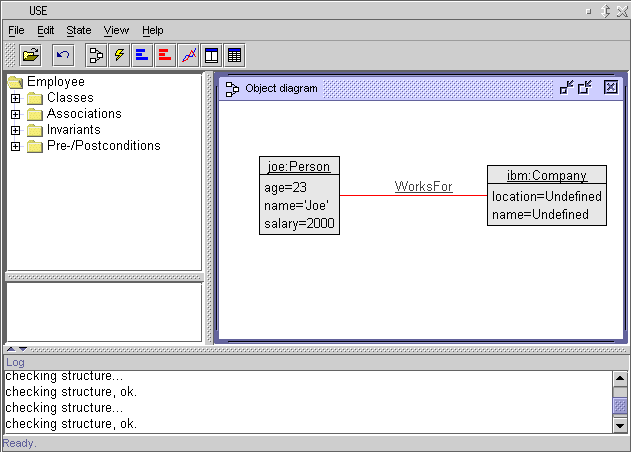
We can simulate the execution of an operation with the usual USE primitives for changing a system state. The postcondition of the hire operation requires that a WorksFor link between the person and the company has to be created. We also set the salary of the new employee.
The object diagram shows the new system state with the link between the person and company objects.
After generating all side-effects of an operation, we are ready to exit the operation and check its postconditions. The command opexit simulates a return from the currently active operation. The syntax is
!opexit [<result-expression>]
The optional <result-expression> is only required for operations with a result value. An example will be given later. The operation hire specifies no result, so we can just issue
The opexit command has the following effect.
In our example, the postcondition hirePost is satisfied.
The operation has been removed from the call stack.
All variable bindings local to operations are removed on exit.
Note that object names are elements of the top-level bindings. If you create new objects inside an operation call, their names will still be available after exiting the operation.
The operation raiseSalary in class Person is used for changing the salary of an employee by a given rate. The following constraints are added to the model specification.
context Person::raiseSalary(rate : Real) : Real
  post raiseSalaryPost:
    salary = salary@pre * (1.0 + rate)
  post resultPost:
    result = salary
The first postcondition raiseSalaryPost requires that the new value of the salary attribute equals a value that is computed in terms of the previous value using the @pre modifier. The second postcondition resultPost specifies that the result value of the operation equals the new salary.
We call raiseSalary on the new employee joe. The rate 0.1 is given to raise the salary by 10%.
The salary attribute is assigned a new value with the set command.
Since raiseSalary is an operation with a return value, we have to specify a result value on exit. This value is bound to the OCL result variable when the postconditions are evaluated.
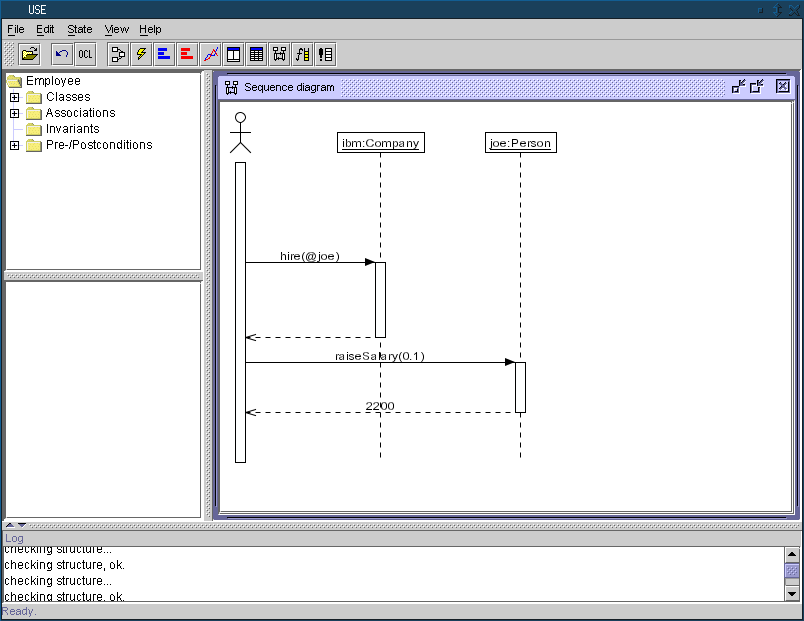
The USE tool can visualize a sequence of operation calls as a UML sequence diagram. The following screenshot shows the sequence of calls for the example. During a validation session the diagram is automatically updated on each operation call.
Here is another example modeling a graph structure. Objects of class Node represent nodes of a graph that can be connected by edges. Each node can be connected to an arbitrary number of source and target nodes. The Node class contains an operation newTarget(). The purpose of this operation is to (1) create a new node and (2) to insert a new edge between the source node and the new target node.
model Graph

class Node
operations
  newTarget()
end

association Edge between
  Node[*] role source
  Node[*] role target
end

constraints

context Node::newTarget()
  -- the operation must link exactly one target node
  post oneNewTarget:
    (target - target@pre)->size() = 1

  -- the target node must not exist before
  post targetNodeIsNew:
    (target - target@pre)->forAll(n | n.oclIsNew())
The postcondition targetNodeIsNew also demonstrates the application of the OCL operation oclIsNew to check for the creation of new objects.
We use the following command script for animating the model. The script simulates three operation calls. The first one is expected to succeed while the second and third one should violate the postconditions.
Here is the output of the USE tool confirming our expectations about the success and failure of postconditions. Details during the evaluation of failing postconditions provide hints about what went wrong.
$ use -nogui Graph.use Graph.cmd
use version 1.6.0, Copyright (C) 1999,2000,2001 Mark Richters
Graph.cmd> !create n1 : Node
Graph.cmd>
Graph.cmd> -- this call satisfies both postconditions
Graph.cmd> !openter n1 newTarget()
Graph.cmd> !create n2 : Node
Graph.cmd> !insert (n1,n2) into Edge
Graph.cmd> !opexit
postcondition `oneNewTarget' is true
postcondition `targetNodeIsNew' is true
Graph.cmd>
Graph.cmd> -- postcondition oneNewTarget fails,
Graph.cmd> -- because n3 is not linked to n1
Graph.cmd> !openter n1 newTarget()
Graph.cmd> !create n3 : Node
Graph.cmd> !opexit
postcondition `oneNewTarget' is false
evaluation results:
  self : Node = @n1
  self.target : Set(Node) = Set{@n2}
  self : Node = @n1
  self.target@pre : Set(Node) = Set{@n2}
  (self.target - self.target@pre) : Set(Node) = Set{}
  (self.target - self.target@pre)->size : Integer = 0
  1 : Integer = 1
  ((self.target - self.target@pre)->size = 1) : Boolean = false
postcondition `targetNodeIsNew' is true
Graph.cmd>
Graph.cmd> -- postcondition targetNodeIsNew fails,
Graph.cmd> -- because n3 has already been created above
Graph.cmd> !openter n1 newTarget()
Graph.cmd> !insert (n1,n3) into Edge
Graph.cmd> !opexit
postcondition `oneNewTarget' is true
postcondition `targetNodeIsNew' is false
evaluation results:
  self : Node = @n1
  self.target : Set(Node) = Set{@n2,@n3}
  self : Node = @n1
  self.target@pre : Set(Node) = Set{@n2}
  (self.target - self.target@pre) : Set(Node) = Set{@n3}
  n : Node = @n3
  n.oclIsNew : Boolean = false
  (self.target - self.target@pre)->forAll(n : Node | n.oclIsNew) : Boolean = false
Graph.cmd>
The screenshot below shows the sequence diagram automatically generated from the example. Dashed return arrows in red indicate that a postcondition failed on exit from an operation call.
This example shows how operation calls may be nested in the simulation. It also shows that postconditions may be specified on operations without side-effects. An OCL expression can be given to describe the computation of a side-effect free operation. In the example, we use a recursive definition of the factorial function.
model NestedOperationCalls

class Rec
operations
  fac(n : Integer) : Integer =
    if n <= 1 then 1 else n * self.fac(n - 1) endif
end

constraints

context Rec::fac(n : Integer) : Integer
  pre:  n > 0
  post: result = n * fac(n - 1)
The postcondition reflects the inductive case of the definition of the factorial function. The following commands show the computation of 3!.
The call stack now looks like this.
We exit the operations in reverse order and provide result values that satisfy the postcondition.
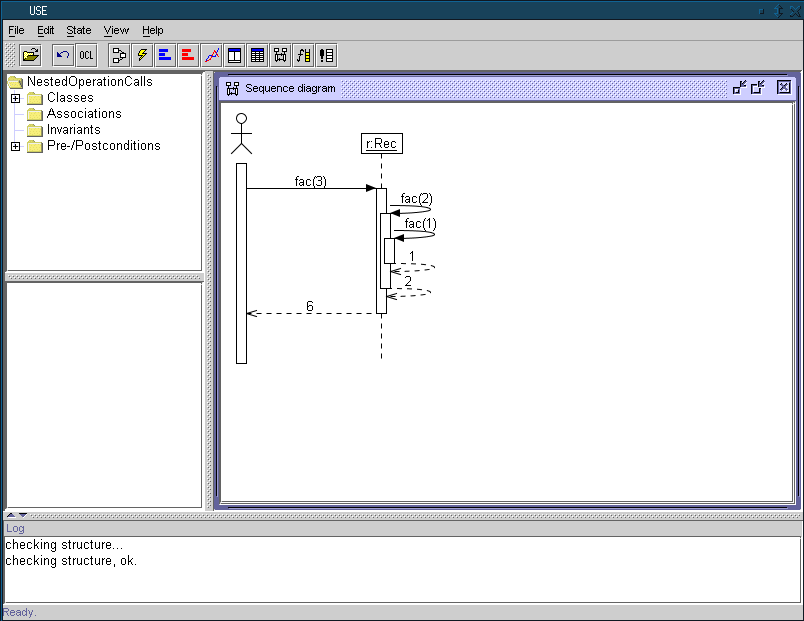
The screenshot below shows the sequence diagram automatically generated from the example. Note the stacked activation frames resulting from the recursion.
Home|People|Teaching|PublicationsLast change: 17.04.2008 by Fabian Buettner (green@informatik.uni-bremen.de)